IN THIS ARTICLE
Creating Character Animations with the Simple Motion Component
To create character animations with the Track View, you can add the Simple Motion component and the Actor component to an entity. You then add the entity to a track view sequence and specify the motions that you want your character to animate. When you add a motion track to a track view sequence, the Track View drives animation on the Simple Motion component and its properties:
- Motion
- Play speed
- Play time
- Blend in time
- Blend out time
For more information, see the Simple Motion component.
Note:The Play speed property is always set to
0.0. This is because the Track View will set the Play time value every frame to drive the playback of the motion. This allows scrubbing and playback in the Track View as well as playback in the game.When you add the Simple Motion component to a track view sequence, the Preview in Editor property is automatically enabled.
To add the Simple Motion component in the Track View editor
In O3DE Editor, right-click in the viewport and choose Create entity.
Enter a name for the entity.
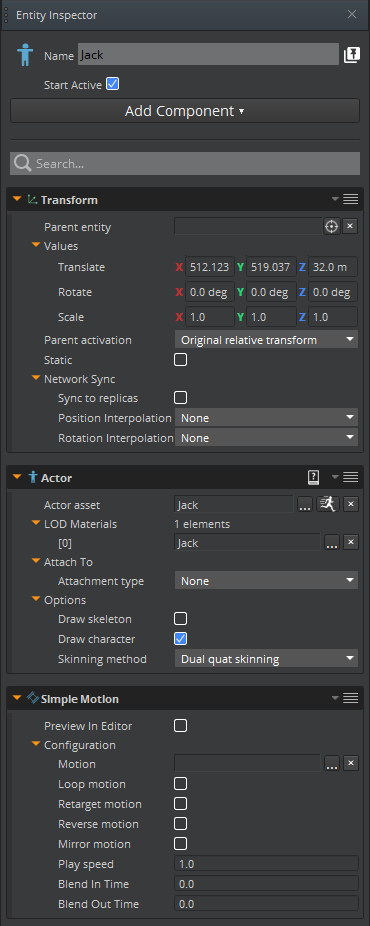
In the Entity Inspector, click Add Component, and then choose the Simple Motion component.
Add the Actor component.
In the Actor component, for Actor asset, specify an actor file. For example, you can specify the
Jack.fbxfile. ExampleYour entity should look like the following.
In O3DE Editor, choose Tools, Track View.
Click the **Add Sequence **icon
 , enter a sequence name, and then click OK.
Select the entity in the viewport, right-click the sequence, and then choose Add Selected Entity.
This adds the entity and its components to the track view sequence.
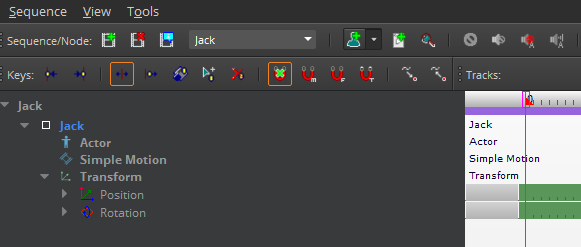
Right-click** Simple Motion**, choose **Add Track**, and then choose the **Motion** option.
In the timeline, for Simple Motion, double-click to create to a key.
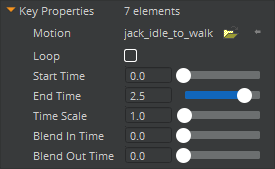
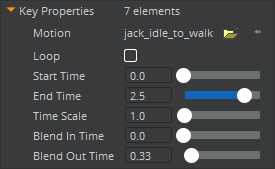
Click the key and in the Key Properties dialog box, specify the following:
For Motion, click the folder icon and specify the motion file, such as
jack_idle_to_walk.motion.Specify the parameters that you want, such as the Start Time and End Time.
Note:You can set the Loop parameter so that motion continues to play as long as the track view sequence is set.
Example
Click the play icon
 to view the animation in the track view sequence. You can also drag the Track View needle across the timeline.
Example
to view the animation in the track view sequence. You can also drag the Track View needle across the timeline.
ExampleThe following shows the actor animating the idle to walk motion.
Note:When you update properties in the Track View, the original values for the entity properties are overwritten and are not restored. For example, if you set the Start time to3.0in the Track View, this updates the Simple Motion component properties in the Entity Inspector. If you want to reuse an entity with a Simple Motion component after a track view sequence is completed, update the Play speed parameter; the Play speed parameter always resets to zero in the Track View. You can also avoid this issue by not reusing entities in this way.
Blending Motions in the Track View Editor
The Simple Motion component supports two motions at a time for blending: the currently playing motion and the previously played motion. For example, you can blend two motions so that your actor smoothly transitions between a walk motion to a run motion.
You can set the Blend In Time and Blend Out Time properties for simple animation blending.
- Blend In Time - Specifies how long it takes for the motion that is set to fully blend in from zero to one second.
- Blend Out Time - Specifies how long it will take for a motion to fully blend out from one to zero second.
To blend two motions, overlap two animations and set the Blend Out Time of the last motion to 0.33 seconds, and the Blend In Time of the next motion by 0.33 seconds. This allows the two motions to smoothly chain together in the track view sequence.
Note:If you want your animation to start when the game starts, click the Edit Sequence iconand in the Edit Sequence dialog box, select Autostart, and then click OK. For more information, see Setting Sequence Properties.
The Blend In Time and Blend Out Time parameters affect the bone weight that are set in your DCC.
To blend motions in the Track View Editor
- Double-click the first key and for Blend Out Time, enter
0.33. This allows the first motion,jack_idle_to_walk.motion, to blend into the next motion. Example
For the Simple Motion track, double-click the timeline to create a second key.
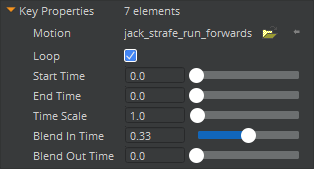
Double-click the key again and in the Key Properties dialog box, specify the following:
For Motion, click the folder icon and specify the next motion, such as the
jack_strafe_run_forwards.motionfile.Specify the parameters that you want, such as the Start Time and End Time. For Blend In Time, enter
0.33. This allows enough time to overlap with the previous motion. Example
Select and drag the second key so that overlaps with the first motion track.
Repeat steps 2 to 4 to add additional motions. For a motion that is ending, enter
0.33for Blend Out Time. For the motion that starts next, enter0.33for Blend In Time. ExampleThe following is a timeline with four motions blended together.
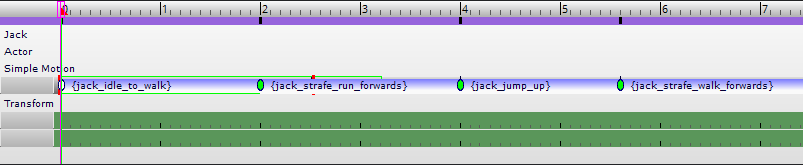
Click the play icon to view the track view sequence. You can also drag the Track View needle across the timeline. The motions blend together in the track view sequence. Example