IN THIS ARTICLE
Project Manager
Project Manager is a standalone application that helps you create, build, and configure Open 3D Engine (O3DE) projects. It provides a GUI-based front-end to the CMake build system and an alternative to many of the commands found in the O3DE CLI .
With Project Manager, you can do the following:
- Create a project, or add an existing project.
- Build a project.
- Open a project in O3DE Editor.
- Add a Gem repo.
- Add or remove Gems from a project using the Gem Catalog.
- Configure the project icon.
- Configure O3DE manifest settings, such as default locations for projects, downloadable (“third-party”) packages, and other O3DE objects on your computer.
Launching Project Manager
To launch Project Manager, do one of the following:
- Open the Project Manager shortcut that was placed on your desktop during installation.
- Launch
o3de.exefrom the engine or project build directory.
The location of o3de.exe depends on how the engine binaries were built:
When you build a source engine, you specify a build directory, such as build/windows or build/linux. The binaries are located in a subdirectory of the build directory. The path name of this subdirectory depends on the build configuration you chose. Example: bin/profile.
To launch Project Manager, do the following:
Open a file browser or command line window on your computer and navigate to the O3DE engine or project directory that contains your build directory.
Locate and launch the Project Manager application,
o3de.exe, from<BUILD_DIRECTORY>/bin/<BUILD_CONFIGURATION>.
Example:
build\windows\bin\profile\o3de.exe
To launch Project Manager, do the following:
Open a file browser or command line window on your computer and navigate to your O3DE install directory.
Locate and launch the Project Manager application,
o3de.exe, from<INSTALL_DIRECTORY>/bin/<PLATFORM>/<BUILD_CONFIGURATION>/Default.
Example:
bin\Windows\profile\Default\o3de.exe
Important:If you built the engine from source using theINSTALLtarget, make sure that you launch Project Manager from the installed engine’s build directory, not the engine’s build directory. This is important, because the engine that Project Manager uses for various operations, such as creating new projects, is determined based on the location of theo3de.exeapplication.
Project Manager reference
The Project Manager application contains the following screens:
- Projects
- Engine
- Project details
- Project settings
- Configure gems
Projects
The Projects tab is the home screen for Project Manager. Here you will find all of your registered O3DE projects.
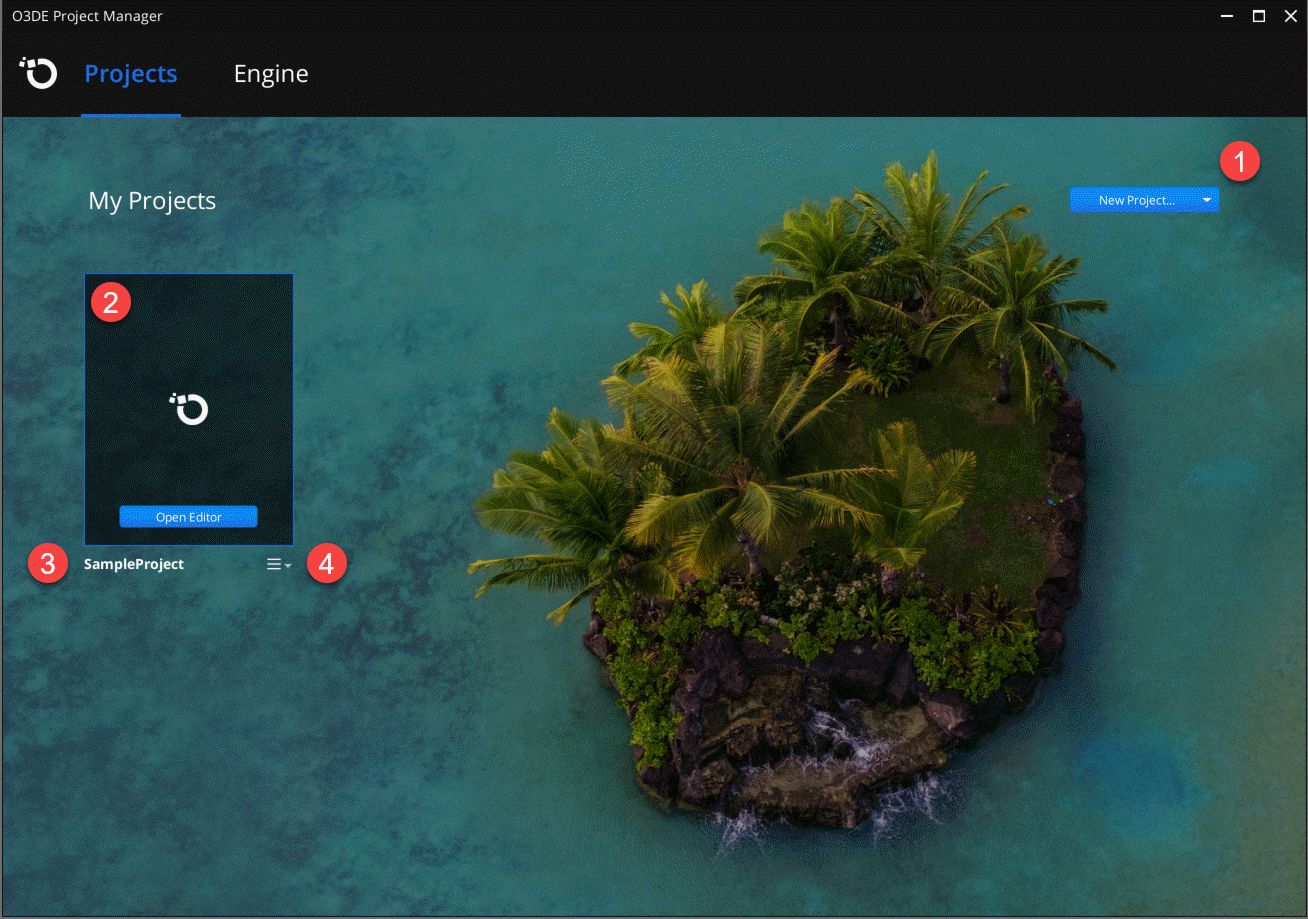
When one or more projects are registered on your computer, the New Project… menu (1) appears in the upper right corner of the window, containing the following choices:
| Action | Description |
|---|---|
| Create New Project | Starts the new project workflow. |
| Add Existing Project | Opens a Select Project Directory browse dialog box, from which you can add an existing O3DE project to Project Manager. This will also register the project in your O3DE manifest. |
Each project is represented by its project icon (2) and a project display name (3). Messages and buttons relevant to the current state of the project appear inside the project icon rectangle. Underneath each project’s icon is the project context drop-down menu (4) containing actions that can be performed on that project.
Note:Hover over the project name below the project icon to show the absolute path to the project as a tooltip.
The project context menu contains the following actions:
| Action | Description |
|---|---|
| Edit Project Settings | Opens the project settings screen, from which you can change selected project settings and configure which Gems are enabled for your project. |
| Configure Gems | Skips the project settings screen and opens the Configure Gems page for your project. |
| Build | Builds the project. |
| Open CMake GUI | Opens the GUI interface for the CMake program to your project directory. |
| Open Project folder | Opens the project folder in a File Explorer window on your computer. |
| Create Editor desktop shortcut | Creates a desktop shortcut that will open your project in O3DE Editor, skipping Project Manager. |
| Duplicate | Creates a duplicate of the project (without the build folder) in a directory of your choosing. It also registers the new project in the O3DE manifest in your user folder. Note that the project display name of the duplicate project will be the same as the original. You can update the display name in Project Settings. |
| Remove from O3DE | Removes the project from Project Manager and the O3DE manifest, but does not delete the project from disk. |
| Delete this Project | Removes the project from Project Manager and the O3DE manifest and deletes the project from disk. |
Engine
The Engine tab contains settings from the engine manifest and the O3DE manifest. The default folder locations are editable on this screen.
Note:The default location for all of the default folders is in your user folder. If you have limited drive space in your user folder, consider changing some of these default folder locations—particularly the “3rd Party Software Folder,” which will contain several GB of downloaded packages after building your first project.
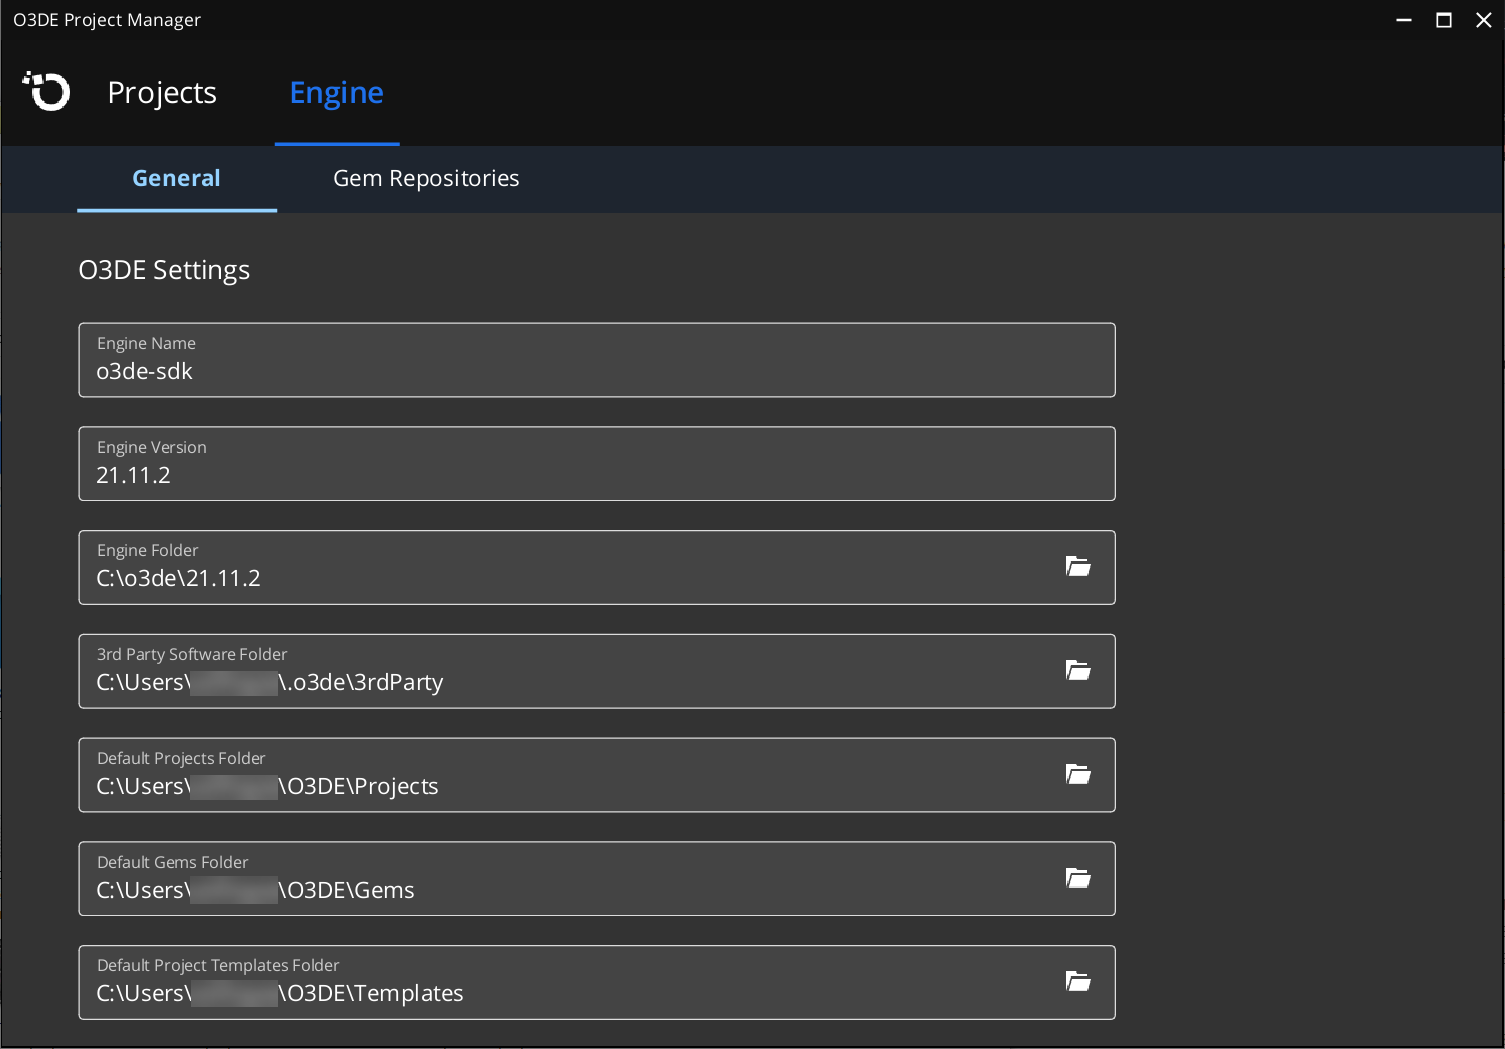
The Engine tab contains the following O3DE settings:
| Setting | Description | Default |
|---|---|---|
| Engine Name | (Read-only) The name of the O3DE engine read from the engine.json manifest of the engine associated with Project Manager when Project Manager was launched. | |
| Engine Version | (Read-only) The O3DE engine version read from the engine.json manifest of the engine associated with Project Manager when Project Manager was launched. | |
| Engine Folder | (Read-only) The location of the O3DE engine associated with Project Manager when Project Manager was launched. Clicking on the folder icon opens the engine folder in a File Explorer window on your computer. | |
| 3rd Party Software Folder | Defines the location of the downloadable packages used by O3DE and its components. | <user>/.o3de/3rdParty |
| Default Projects Folder | Defines the default folder for projects. New projects will be created in this folder unless a different path is specified during the new project workflow. | <user>/O3DE/Projects |
| Default Gems Folder | Defines the default folder for Gems. New Gems will be created in this folder unless a different path is specified when the Gem is created. | <user>/O3DE/Gems |
| Default Project Templates Folder | Defines the default folder for project templates. New project templates will be created in this folder unless a different path is specified when the project template is created. | <user>/O3DE/Templates |
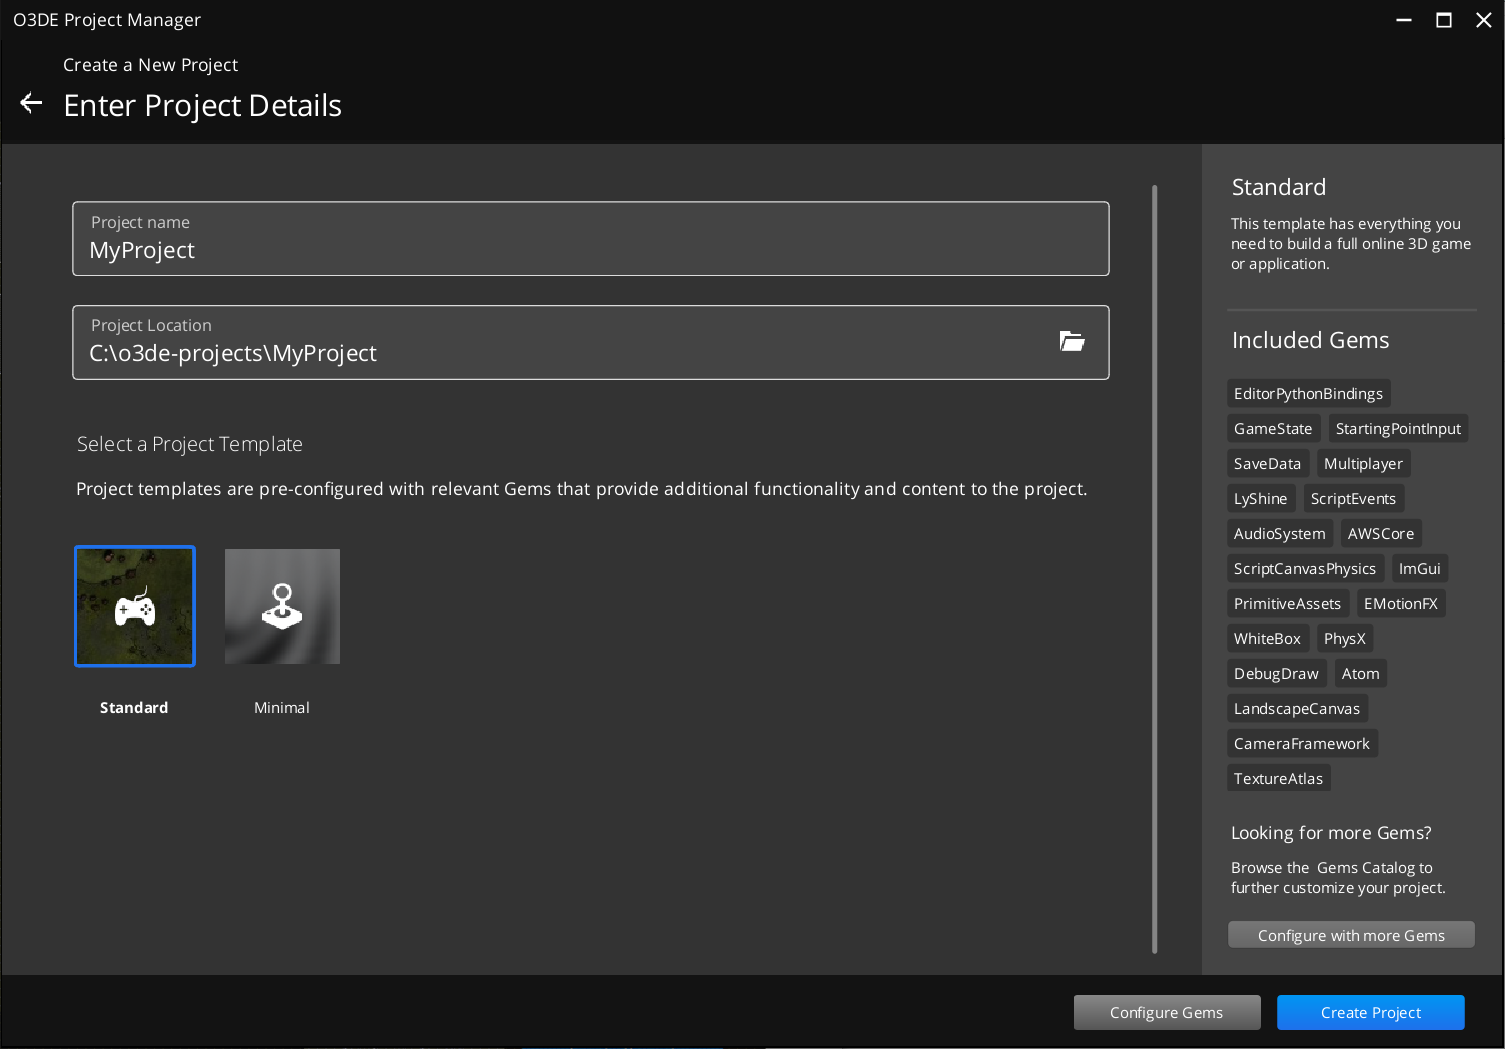
Project details
The Enter Project Details screen is part of the “new project” workflow. On this screen, you can set the project’s name and location on your computer. You can also choose the project template, which defines the initial set of Gems that are enabled in your new project. You can further refine the initial set of Gems using the Configure Gems button.
Project settings
The Edit Project Settings menu action in the project context menu opens the Edit Project Settings screen. On this screen, you can change the project’s display name and update the project’s icon. These settings and other information are stored in the project.json file located at the root of your project directory. You can also change the set of Gems that are enabled for your project using the Configure Gems button.
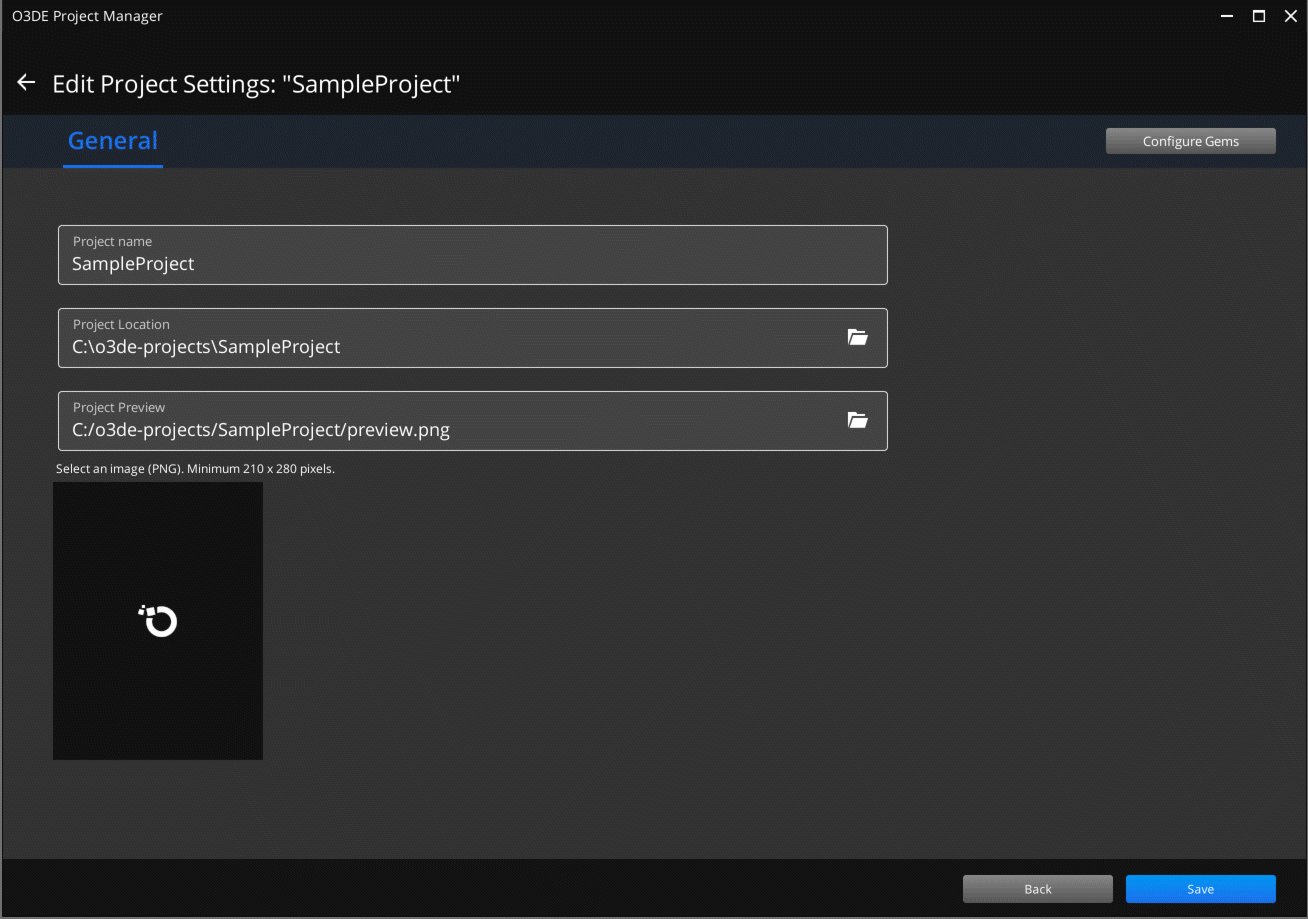
The Edit Project Settings screen contains the following project settings:
| Setting | Description |
|---|---|
| Project Name | The project’s display name. This is the name that’s displayed under the project icon on the Projects tab in Project Manager. |
| Project Location | The project’s location on your computer. If you select a different folder using the folder button, Project Manager will move your project to the new location and update the O3DE manifest with the new path. A project rebuild is required after moving your project in this way. |
| Project Preview | The path to the project icon image. The filename will always be preview.png. If you select a different image using the folder button, Project Manager will copy the image to your project folder and rename it preview.png. |
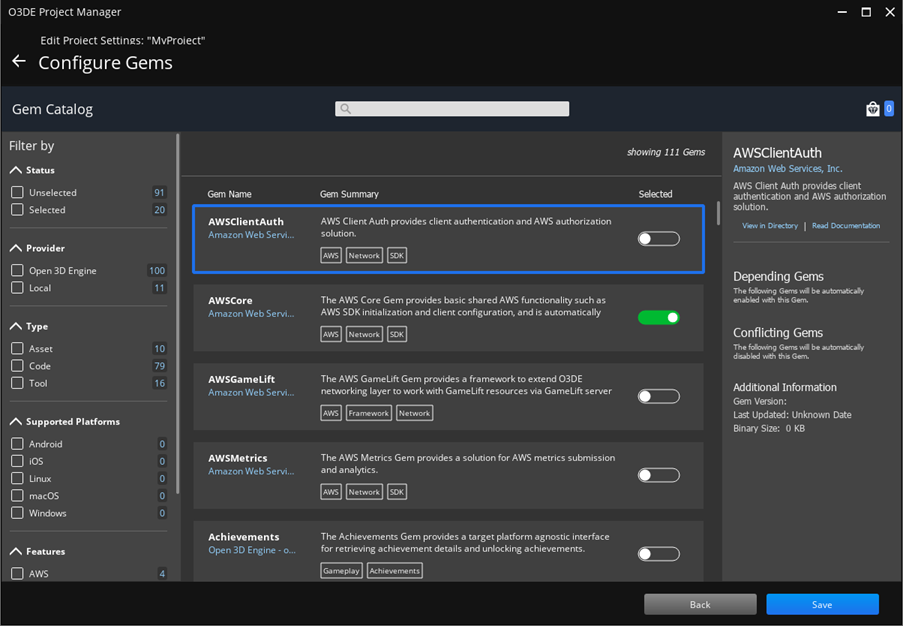
Configure Gems
The Configure Gems screen enables you to change the collection of Gems that are enabled in your project. You can open this screen during the new project workflow, from the Enter Project Details screen, or from the Edit Project Settings screen of an existing project. You can use the Gem Catalog in the Configure Gems screen to find and enable new Gems for your project. Refer to Adding and Removing Gems in a Project for instructions on using Configure Gems.