IN THIS ARTICLE
Working with Layers
Use the O3DE layer system to organize level data into discrete files. The layer system segments level content so that members of a development team can work on different aspects of a level asynchronously.
Layers are standard O3DE entities with a special editor-only layer component. In your game, this component appears as an empty entity in your hierarchy. When you export your game, the behavior you designed is unchanged and all entities in your level are added to the exported data.
Topics
- Creating a Layer
- Modifying a Layer
- Adding Entities to a Layer
- Saving a Layer
- Recovering a Layer
- Layer-Specific Components
Creating a Layer
When you create a layer, you can add entities to that layer. This helps you organize the content in your game. For example, you might create a layer for all character entities and another layer for vegetation.
To create a layer
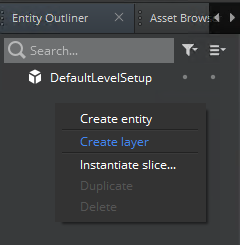
In O3DE Editor, choose Tools, Entity Outliner.
In the Entity Outliner, right-click and choose Create layer.
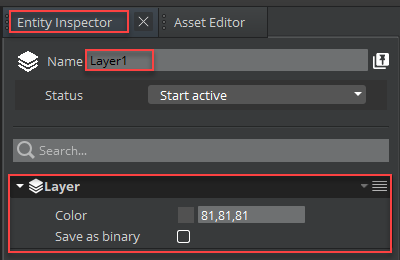
- With the layer selected in the Entity Outliner, you can modify its properties in the Entity Inspector.
Modifying a Layer
After you create a layer, you can modify it by adding entities, reorganizing its hierarchy, adding nested layers, renaming the layer, and so on.
To show a layer’s context menu
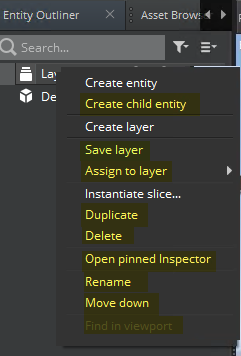
In the Entity Outliner, right-click the layer.
You can do the following in the context menu.
Actions highlighted in yellow affect the selected layer. The other options are standard context menu actions that don’t affect the selected layer.
The following options in the context menu perform actions on the selected layer.
Layer Hierarchies
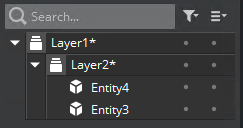
You can nest layers within other layers. This is useful if you want to organize the enitites in your level. This behavior is similar to creating hierarchies for parent and child entities.
Note:You can’t make a layer a child of a non-layer entity and you can’t save a layer in a slice.
You can nest layers to break up your level into smaller, more workable sections. If you are creating a large level, for example, you might have a single vegetation layer. If you have just one vegetation layer, then only one environment artist could edit this layer at a time. To allow multiple artists to work on the vegetation layer at once, you can nest other layers within the vegetation layer and assign each nested layer to different artists. This helps build a well-organized hierarchy to keep the game’s structure efficient.
Adding Entities to a Layer
Layers can contain freestanding (non-slice) entities and slices.
To add an entity to a layer
In the Entity Outliner, do one of the following:
Select and drag an entity to a layer or within the layer hierarchy.
Right-click an entity, pause on Assign to layer, and then select a layer.
Saving a Layer
The component entity system saves references to layers and their hierarchies in the level data. When you add or remove a layer from your level, you must save your level before making more changes. If you don’t save your level, layers and their contents will not load correctly the next time you open the level.
O3DE layers are saved as .layer files in the level_name/layers directory. The layer’s filename is saved as layer_name.layer. If a layer is nested within another layer, then the parent layer name is prepended to the layer filename.
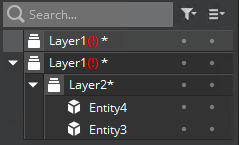
When a layer contains unsaved changes, an asterisk (*) appears next to the layer name. After you save the level or the layer, the asterisk is removed.

Layer names at the same hierarchy level must be unique. Layers at the same hierarchy level with duplicate names display a warning (!) and can’t be saved until you rename them.
To save your level and all layers
- In O3DE Editor, choose File, Save or press Ctrl+S.
To save specific layers only
Select the layer you want to save, or press CTRL and then select multiple layers.
In the Entity Outliner, right-click the selection and choose Save.
Recovering a Layer
If you delete a layer from a level in O3DE Editor, you can reimport it.
To reimport a deleted layer
Using a file browser, copy onto your desktop the layer file for the layer that you want to recover, such as
level_name\layer\layer_name.layer.In O3DE Editor, create a new layer in your level and enter the same name as the deleted layer.
Save the level and close O3DE Editor.
Copy the layer file from your desktop into O3DE’s layer directory, such as
level_name/layers.Rename the copied layer file to match and replace the layer that you created in O3DE Editor.
Reopen the level. The newly created layer now references the recovered layer information.
Layer-Specific Components
A layer is simply an entity with special rules. As such, you can add layer-specific components to layers. By default, O3DE doesn’t contain any layer-specific components, but you can create your own, such as special layer components for streaming or tags.
Any given component can appear in only one context menu. By default, O3DE has the Game, System, and Layer contexts for components.
You can test creating a layer-specific component by editing the Comment component.
To modify the Comment component
In a text editor, open the
EditorCommentComponent.cppfile.Change the
AZ_CRCattribute to Layer and delete the CRC value.Save the file.
In O3DE Editor, add the Comment component to a layer.