IN THIS ARTICLE
Navigation Area Component
The Navigation Area component defines the features of a navigable area or volume for use by the AI System. You use this component with the Polygon Prism Shape component, which defines the volume of the navigation area.
Note:When you add a Navigation Area component, you must also add the Polygon Prism Shape component.
For instructions on how to adjust the Polygon Prism Shape component, see Polygon Prism Shape .
When you create a Navigation Area, all areas that are traversable by the specified AI Agent Type show as blue when you render the navigation mesh . Any areas that are not traversable render as blank areas, such as deep pits and steep slopes. Exclusion areas and areas around static objects also render as blank areas. Even if your navigation area is divided into separate pieces by static objects, terrain features, and exclusion areas, each traversable area renders blue.
You can use a Navigation Seed component to fine-tune AI accessibility.
To add a Navigation Area {#create-navigation-area}
In the Viewport, near where you want to create your navigation area, right-click and choose Create entity.
With your new entity selected in the Entity Outliner, add the Navigation Area component to it.
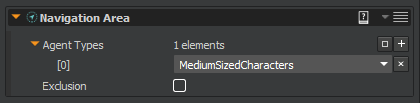
In the Navigation Area component, next to Agent Types, click +.
Next to [0], select MediumSizedCharacters. This property defines the types of agents that can navigate in this area.
Add the Polygon Prism component. Adjust the size, shape, and height of the Polygon Prism. Ensure that your terrain and objects intersect with the volume of the polygon prism.
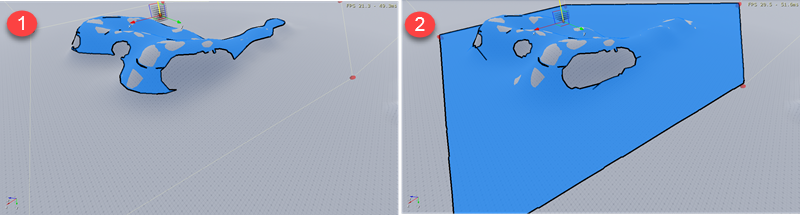
If your polygon prism hovers above your terrain and does not fully intersect with it, the navigation system does not produce the appropriate traversable areas. The following examples show a navigation area that is too high above the terrain (1), and a navigation area appropriately situated on the terrain (2). If your navigation area is too high, use the move tool to lower the Z (up and down) position of the entity.
To view the generated Navigation Area mesh {#render-navigation-mesh}
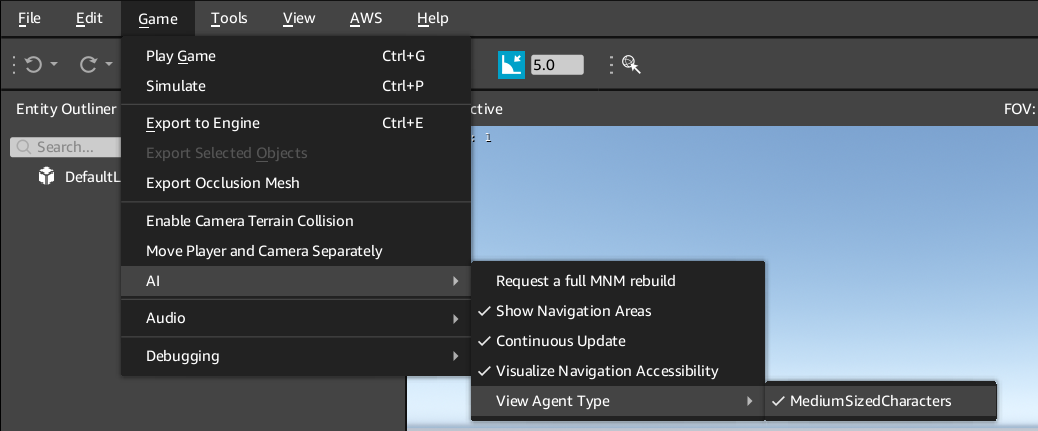
In O3DE Editor, choose Game, AI, Show Navigation Areas.
In O3DE Editor, choose Game, AI, View Agent Type, and then enable the agent type that you want to display.
In O3DE Editor, choose Game, AI, Continuous Update to show changes in the navigation mesh as you modify the terrain or area.
A navigation mesh shows traversable areas in blue.
Navigation Area Component Properties
The Navigation Area component has the following properties: {#component-nav-area-properties-agent-types}
Agent Types
Specifies the types of AI that can traverse this navigation area. These agent types are defined in the Scripts\AI\Navigation.xml file of your project. To specify multiple agent types for this area, click the + icon.
You use this property to restrict which agents can navigate within that area. For example, you can allow characters to navigate within a narrow corridor but restrict vehicles.
To define an agent type on your AI, see the
Navigation
component.
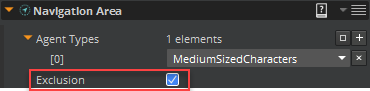
Exclusion When selected, creates a subtractive navigation area. This creates a cutout within an existing navigation mesh. For more information, see Creating Navigation Mesh Exclusion Areas .
Navigating Around Static Objects
When O3DE creates the navigation mesh, it can automatically exclude areas that should not be traversable, such as a large boulder or tree trunk. To ensure that these areas are correctly detected by the navigation system, you must specify its Transform component as static.
To mark an entity as static
In the Entity Outliner, select the entity. This can be a tree, boulder, building, or any object that you don’t want the AI to walk through.
In the Transform component, select the Static property.
The following example shows a navigation mesh around a boulder when the Static property is not selected.
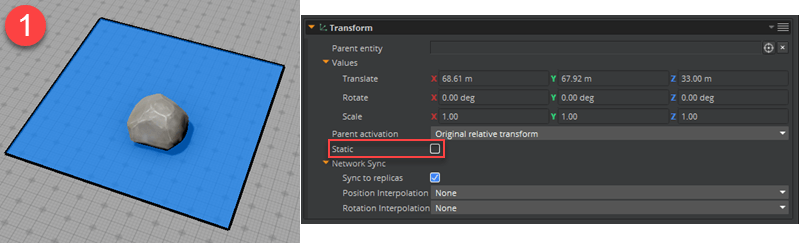
The following example shows the same navigation mesh, but with the Static property selected on the boulder.

Creating Navigation Mesh Exclusion Areas
You can use the Navigation Area component to manually create areas to exclude from the navigation mesh. This means that the AI agents cannot traverse these areas. To do this, you create a navigation area and select the Exclusion property, as shown in the following image.
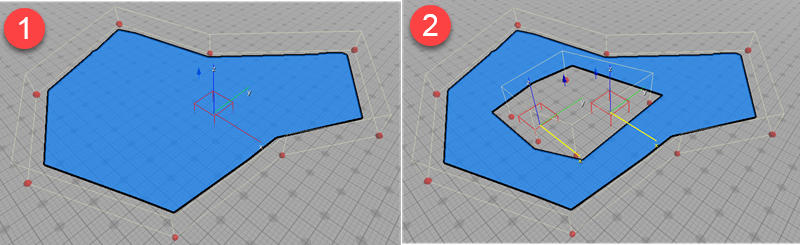
The following example shows a navigation mesh (1) and the same navigation mesh with an exclusion area (2).
To create an exclusion area
If you have not already, you must first create a navigation area that is not an exclusion area.
Create an entity, and add to it the Navigation Area and Polygon Prism Shape components.
In the Navigation Area component, select the Exclusion property.
In the Viewport, place the exclusion area within the navigation mesh.
Shape the polygon to the preferred shape for the exclusion area.
Navigation Physics Integration
The navigation system builds the navigation mesh based on all the static physics colliders provided by the physics system, including terrain.
Physics integration details
When AZ::Physics integration mode is enabled, the navigation mesh voxelizer issues a WorldRequestBus::Overlap static query to gather colliders within a bounding box. Shape geometry is returned from the new AZ::Shape::GetGeometry() method. PhysX colliders for terrain, shapes, and meshes will provide triangle data in an operation that acquires a PhysX scene read lock while retrieving geometry data.
NavigationAreaRequestBus EBus Interface
Use the following request function with the NavigationAreaRequestBus EBus interface to communicate with other components of your game.
For more information about using the event bus (EBus) interface, see Working with the Event Bus (EBus) system
RefreshArea
You can use the
PolygonPrismShapeComponentRequestBus
to modify the polygon prism area by adding, removing, and updating its vertex positions. Use RefreshArea to update the navigation area after making changes to the area.
Parameters None
Return
AZ::ConstPolygonPrismPtr
Scriptable No
Note:The Navigation Area component depends on the Polygon Prism component, which also usesVertexContainerfunctions. For more information, see Vertex Containers.