IN THIS ARTICLE
Material Editor
The Material Editor is a standalone application that allows artists to view, edit, and create new materials. This section introduces the Material Editor and describes the editor layout and its individual panels.
Quick Start
To get started, launch the Material Editor and create or edit a material.
Launch the Material Editor
You can launch the Material Editor from the Open 3D Engine (O3DE) Editor, or as a standalone application:
From the O3DE Editor, you can launch Material Editor in two ways.
Select Main Menu > Tools > Material Editor.
From a Material component in the Inspector, select Edit Material in Material Editor… in the hamburger menu of a material assignment slot.
As a standalone application, launch the executable
<build>\bin\profile\MaterialEditor.exe.
Create or edit a material
You can create a new material or edit an existing material from the File menu in the Material Editor, or from the Context menu in the Asset Browser:
From the File menu in the Material Editor:
To create a new material, choose New and choose a material type for the new material.
To open an existing material, choose Open… or Open Recent, and select an existing material.
From the Context menu in the Asset Browser:
Select a
.materialfile.Then, right-click the
.materialfile to open the context menu.Choose Open in Material Editor… to open the material in the Material Editor.
Title bar
The title bar of the main window displays which rendering backend is being used (DX12 or Vulkan).
Main Menus
At the top of the Material Editor are the following menus: File, Edit, View, and Help.
File Menu
The File menu contains options to manage the Material Editor and material files.
| Menu item | Hotkey | Function |
|---|---|---|
| New | Ctrl+N | Create a new material. Choose a material type from the list to create a new material of that type. |
| Open… | Ctrl+O | Open an existing material. |
| Save | Ctrl+S | Save the edits in the active material tab. |
| Save As… | Save the edits in the active material tab to the specified folder and file name. | |
| Save As Child… | Save a new child material of the current material. | |
| Save All | Save the edits in all open material tabs. | |
| Close | Ctrl+F4 | Close the active material tab. |
| Close All | Close all of the open material tabs. | |
| Close Others | Close all of the material tabs except the active one. | |
| Run Python… | Opens a folder to select a Python script to run. | |
| Exit | Close the Material Editor. |
Edit Menu
The Edit menu contains options that are useful while editing materials.
| Menu item | Hotkey | Function |
|---|---|---|
| Undo | Ctrl+Z | Undo the most recent action. |
| Redo | Ctrl+Y | Redo the most recent action that was undone. |
View Menu
The view menu lets you open or close panels and switch to different tabs in the Material Editor.
| Menu item | Hotkey | Function |
|---|---|---|
| Previous Tab | Ctrl+Shift+Tab | Switches to the previously opened tab. |
| Next Tab | Ctrl+Tab | Switches to the next opened tab. |
| Asset Browser | Toggles the Asset Browser panel. | |
| Inspector | Toggles the Inspector panel. | |
| Viewport Settings | Toggles the Viewport Settings panel. | |
| Performance Monitor | Toggles the Performance Monitor panel. | |
| Python Terminal | Toggles the Python Terminal panel. |
Help Menu
The Help menu provides support and resources for the Material Editor.
| Menu item | Function |
|---|---|
| Help… | Launches the Material Editor Help window and displays a list of controls in the Material Editor. |
| About… | Displays information about the Material Editor. |
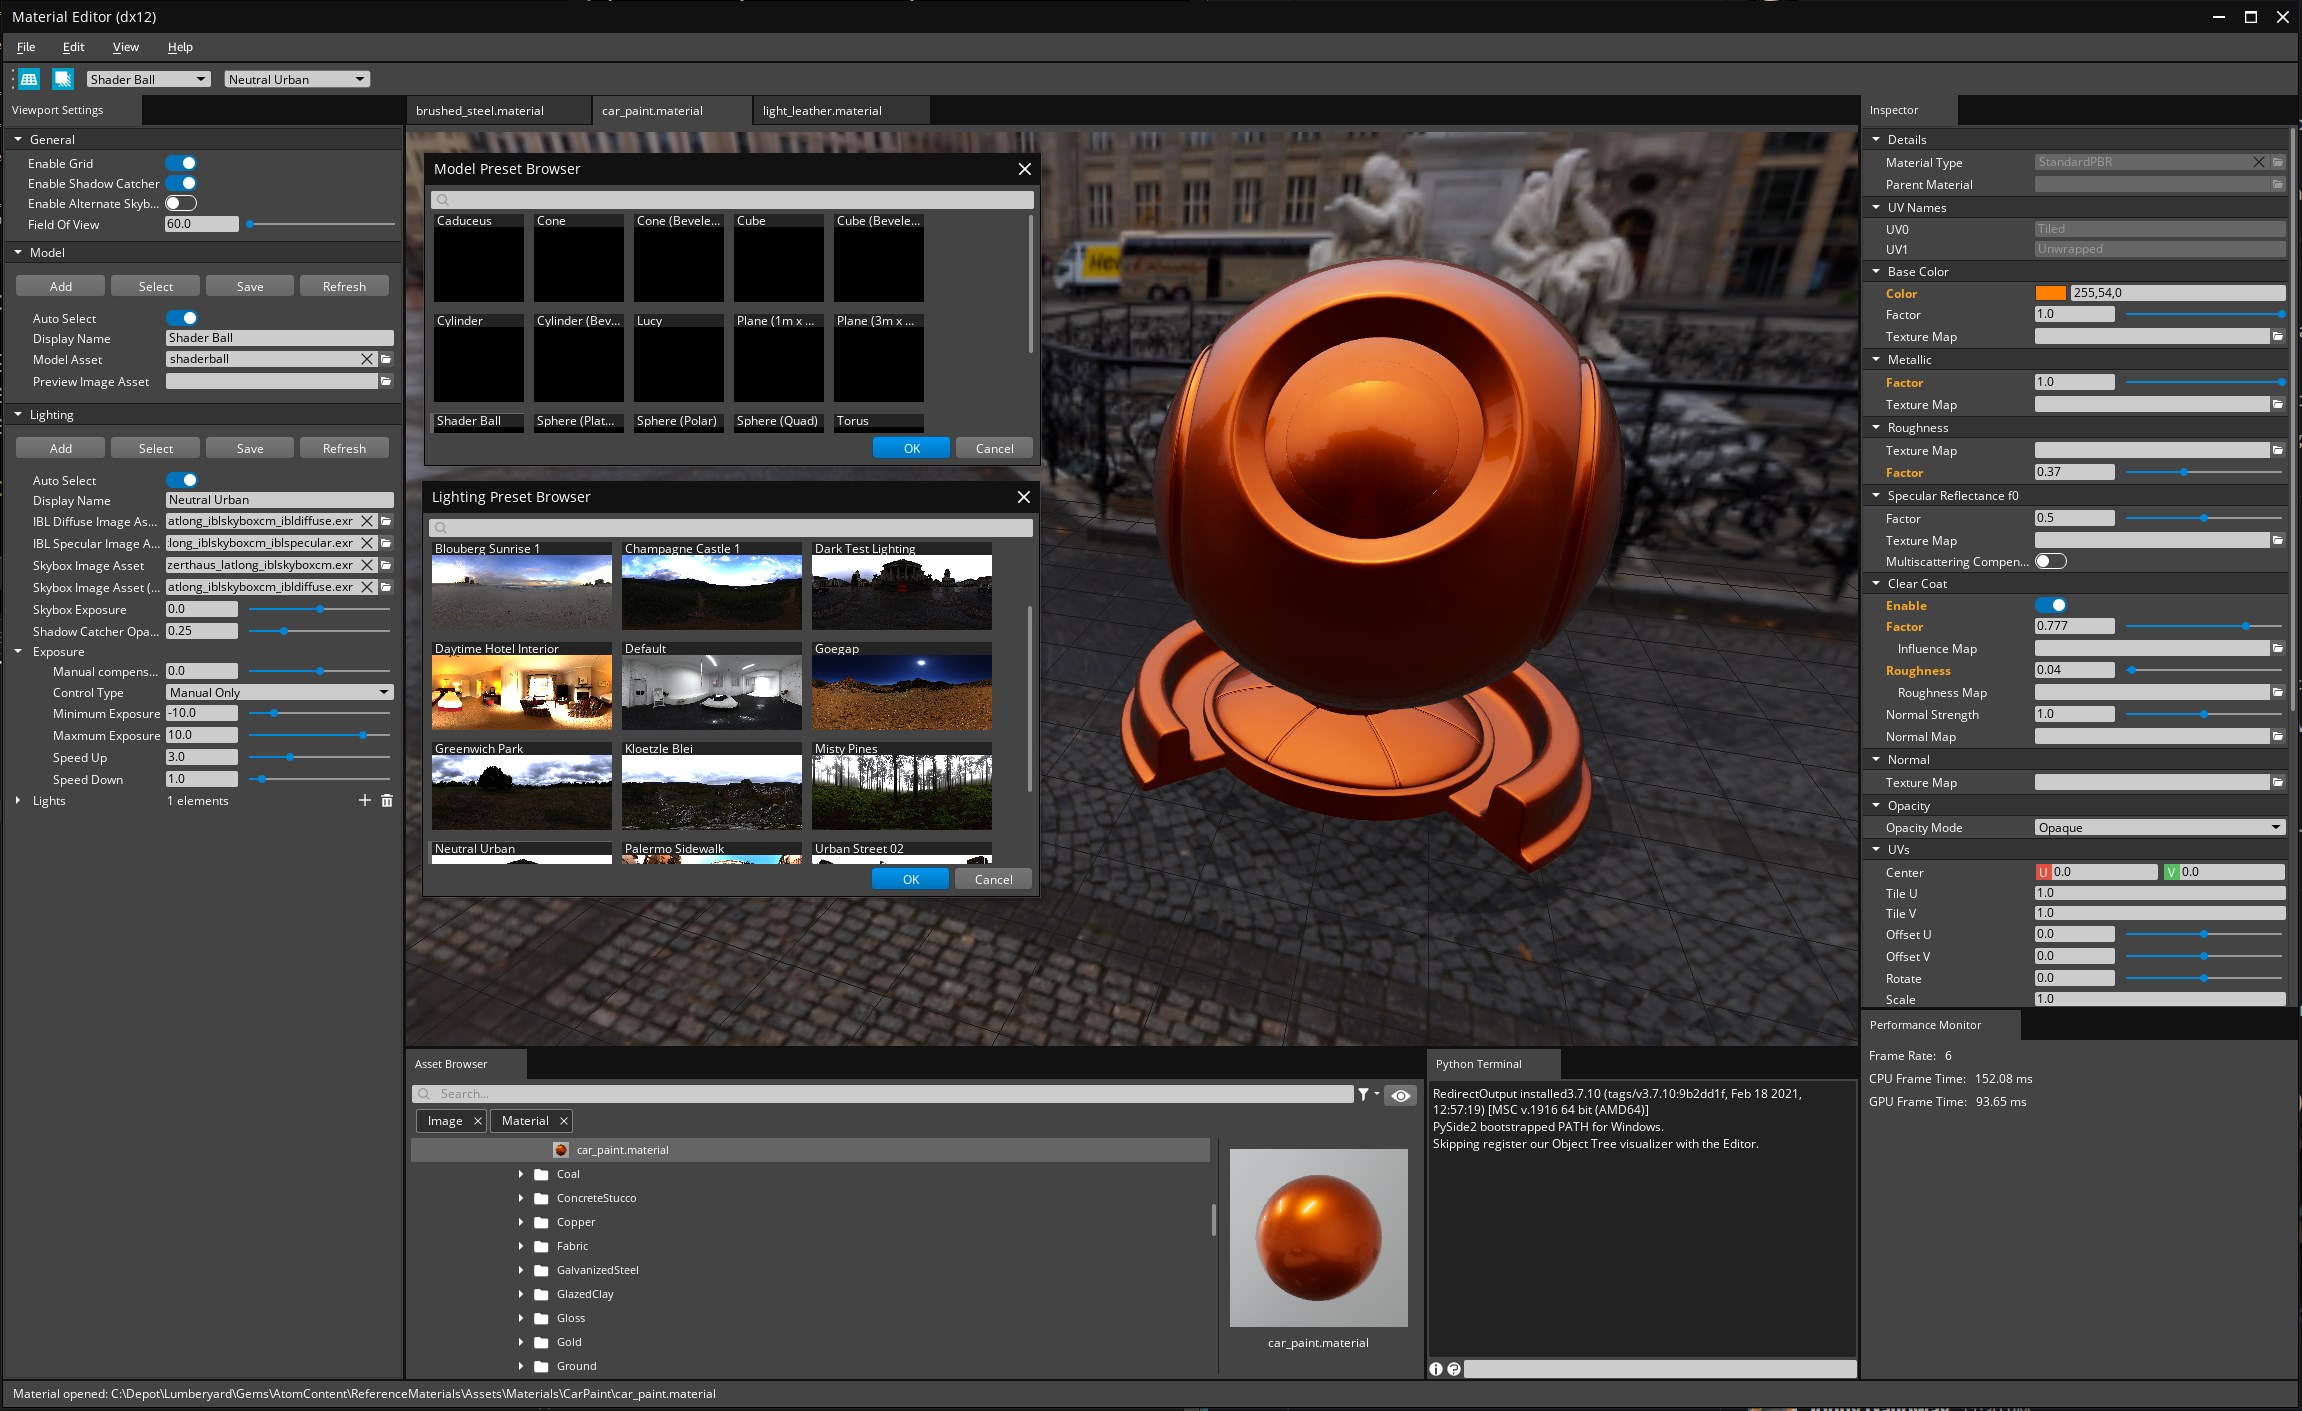
Viewport
Use the Viewport panel to preview opened materials. To preview materials in various environments, configure the 3D model and lighting setup (see the Viewport Toolbar and Viewport Settings sections below).
Material Viewport Tabs
Each opened material is contained in its own Viewport Tab, allowing you to edit multiple materials at once. This is useful for editing the materials of complex assets, such as characters or vehicles, since they are often made of multiple materials.
You can switch tabs to edit different materials; this will change the properties and settings in the Inspector and the Viewport Toolbar. You can reorder tabs, but you can’t undock them from the Viewport.
Note:The Viewport cannot be closed entirely. If all the tabs are closed, the Viewport shows a default scene that contains a blank model, ground, and natural light.
Interacting with the Viewport
You can view your material in the Viewport in different perspectives by moving the camera, model, or lighting environment.
Camera Controls
These controls adjust the camera view.
| Control | Action |
|---|---|
| LMB+Drag, RMB+Drag | Tumble the camera around a pivot or point of interest. |
| MMB Scroll | Dolly the camera toward or away from a pivot or point of interest. |
| MMB+Drag | Track the camera left, right, up, and down in the direction of mouse movement. |
| Z | Reset camera view. |
Model and Lighting Controls
These controls adjust the model and lighting within the current camera view.
| Control | Action |
|---|---|
| Ctrl+LMB+Drag | Tumble the model. |
| Shift+LMB+Drag | Rotate the lighting environment horizontally around the model. |
Industry-standard Controls
Industry-standard controls to orbit, zoom, and pan in the Viewport.
| Control | Action |
|---|---|
| Alt+LMB+Drag | Tumble the camera around a pivot or point of interest. |
| Alt+RMB+Drag | Dolly the camera toward or away from a pivot or point of interest. |
| Alt+MMB+Drag | Track the camera left, right, up, and down in the direction of mouse movement. |
Viewport Toolbar
The Viewport Toolbar contains the following set of functions to configure the Viewport:
| Function | Description |
|---|---|
| Display Ground | Show or hide the ground plane in the Viewport. |
| Display Shadow | Show or hide the shadow effect in the Viewport. |
| View Model Preset | Select a model preset to preview the material on. A model preset can be configured in the Model property group in the Viewport Settings. |
| Lighting Preset | Select a lighting preset to view your material in a specific image-based lighting (IBL) environment. A lighting preset is a set of image-based lighting (IBL) data that can be configured in the Lighting property group in the Viewport Settings. |
Viewport Settings
The Viewport Settings panel displays options to configure the Viewport properties. These properties control how the Viewport appears and which features are active. You can also create or edit configuration presets for the viewport model and the lighting environments.
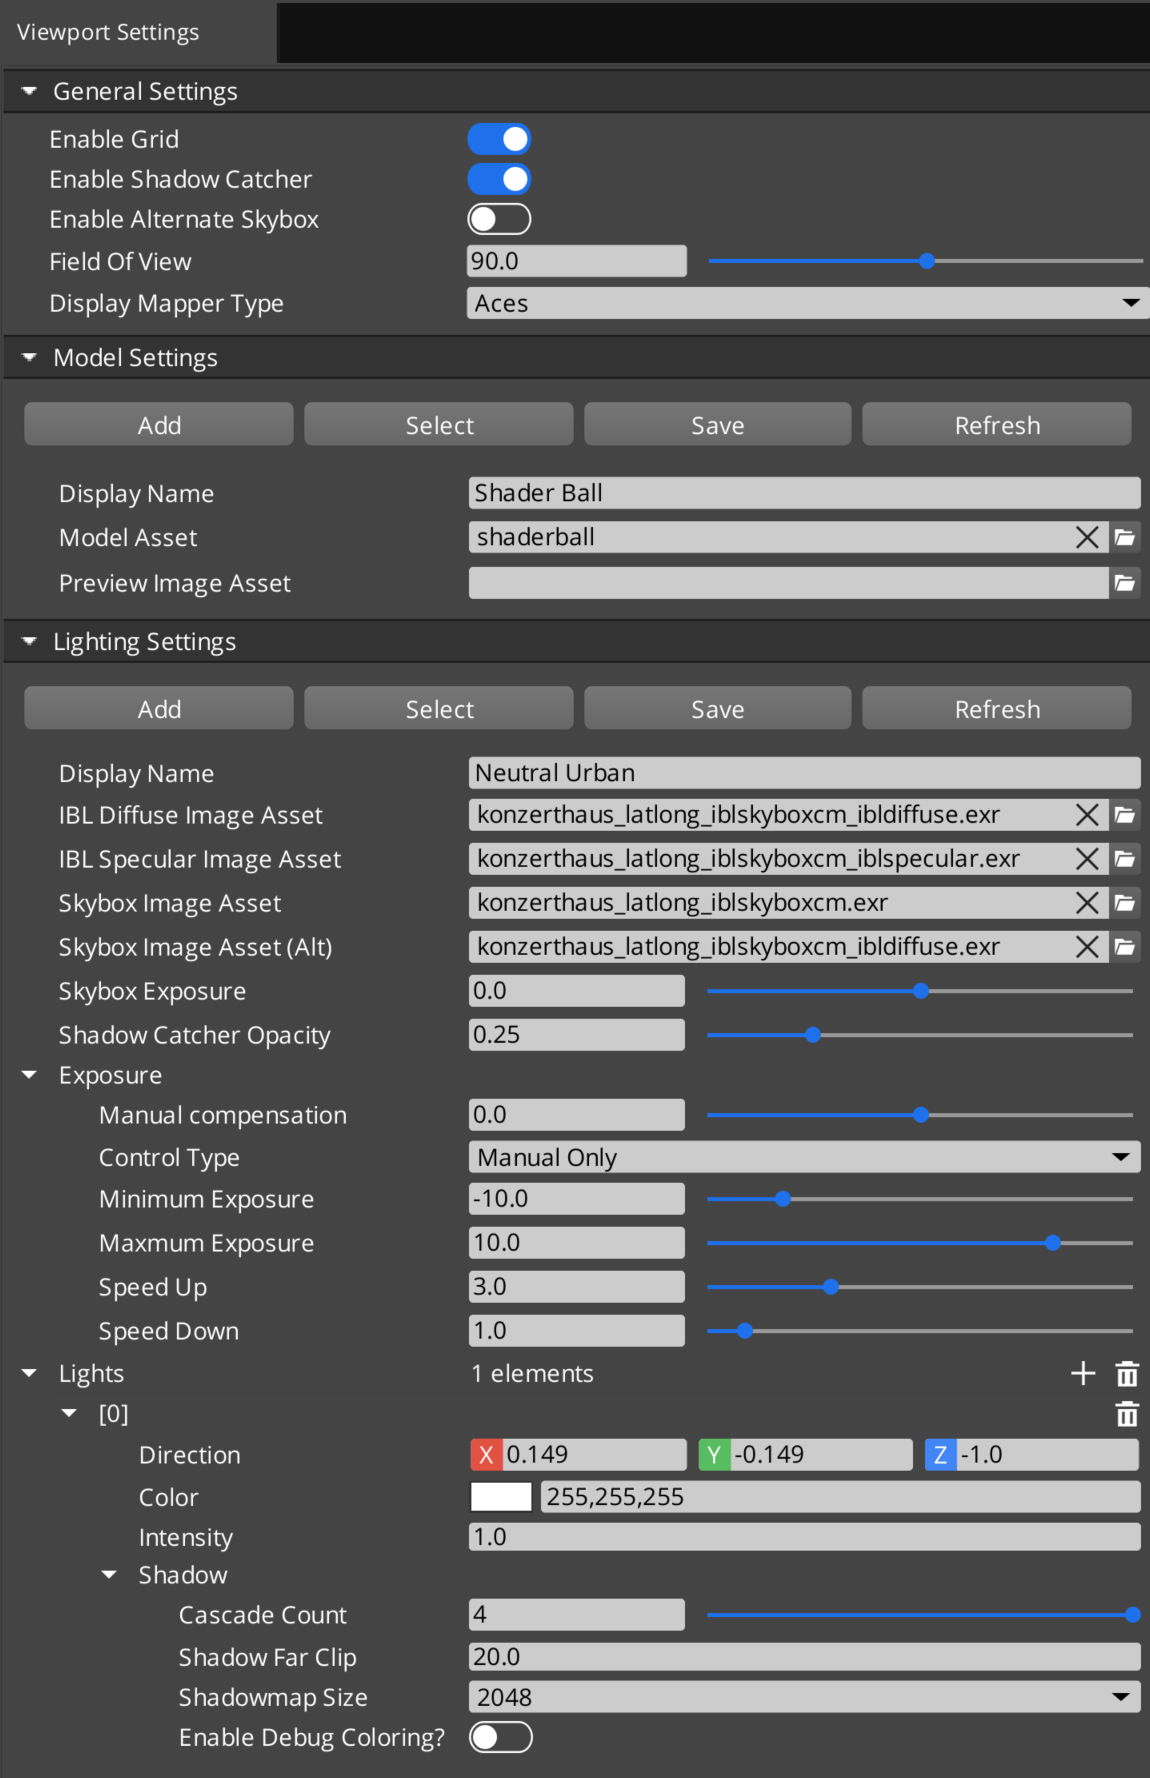
Viewport Settings contains the following settings groups:
General
The General property group contains basic properties that are required by the Viewport.
| Property | Description |
|---|---|
| Enable Grid | Show or hide the ground plane. (This property is also accessible in the Viewport Toolbar.) |
| Enable Shadow Catcher | Show or hide shadow effects. (This property is also accessible in the Viewport Toolbar.) |
| Enable Alternate Skybox | Toggle to display the alternate skybox image if one is specified by the Skybox Image Asset (Alt) property in the lighting preset. |
| Field of View | Adjust the camera’s field of view. |
| Display Mapper Type | Configure tone mapping and color grading |
Model
The Model property group allows you to manage the list of available model presets, and configure their properties. Model presets are useful for previewing materials on a variety of surfaces. Atom includes a collection of basic models, and you can create additional presets with custom models. Model presets are stored in JSON files (*.modelpreset.azasset) and can be configured in the Viewport Settings.
Buttons
These controls are used to create, edit, save, or reset a specific model preset.
| Button | Description |
|---|---|
| Add | Create a new model preset and select a save file location. Model presets can be saved anywhere in your project folder. |
| Select | Open the Model Preset Browser, browse, and select from the list of available model presets. |
| Save | Save changes made to the selected model preset. |
| Refresh | Remove any unsaved changes made to the model preset. |
Properties
The following are properties you can configure for the selected model preset.
| Property | Description |
|---|---|
| Display Name | Specify the name of this preset. The name appears in the Viewport Model drop-down list in the Viewport Toolbar. |
| Model Asset | Assign a model asset for this preset. The model asset must be in FBX format (.fbx). |
| Preview Image Asset | Assign an image as the preview icon for this preset. The image appears in the Viewport Model drop-down list in the Model Preset Browser. |
Model Preset Browser
The Model Preset Browser panel opens when the Select button is pressed. The Model Preset Browser panel is a separate window that cannot be docked.
Lighting
The Lighting property group allows you to manage the list of available lighting presets, and configure their properties. Lighting presets are useful for previewing materials in a variety of lighting conditions. Atom includes a collection of lighting presets, and you can create additional presets with a custom skymap image and lighting properties. Lighting presets are stored in JSON files (*.lightingpreset.azasset), and can be configured in the Viewport Settings.
Buttons
These controls are used to create, edit, save, or reset a specific lighting preset.
| Button | Description |
|---|---|
| Add | Create a new lighting preset and select a save file location. Lighting presets can be saved anywhere in your project folder. |
| Select | Open the Lighting Preset Browser, browse, and select from the list of available lighting presets. |
| Save | Save changes made to the selected lighting preset. |
| Refresh | Remove any unsaved changes made to the lighting preset. |
Properties
The following are properties you can configure for the selected lighting preset.
| Property | Description |
|---|---|
| Display Name | Specify the name of this preset. The name appears in the Viewport Model drop-down list in the Viewport Toolbar. |
| IBL Diffuse Image Asset | Assign a diffuse lighting cubemap to use for IBL. |
| IBL Specular Image Asset | Assign a specular lighting cubemap to use for IBL. |
| Skybox Image Asset | Assign a diffuse lighting cubemap to use as the skybox, or background. |
| Skybox Image Asset (Alt) | Assign a diffuse lighting cubemap to use an alternative skybox, or background. This allows you to have a different background while using the same lighting settings. Enable this skybox using the Enable Alternate Skybox property in the General settings. |
| Skybox Exposure | Adjust the brightness of the skybox. |
| Shadow Catcher Opacity | Adjust the opacity level of the ground plane that catches the model’s shadows. |
| Exposure | A group of settings to configure the exposure. |
| Lights | Manage a list of lights for the active lighting preset. |
Lighting Preset Browser
The Lighting Preset Browser panel opens when the Select button is pressed. The Lighting Preset Browser panel is a separate window that cannot be docked.
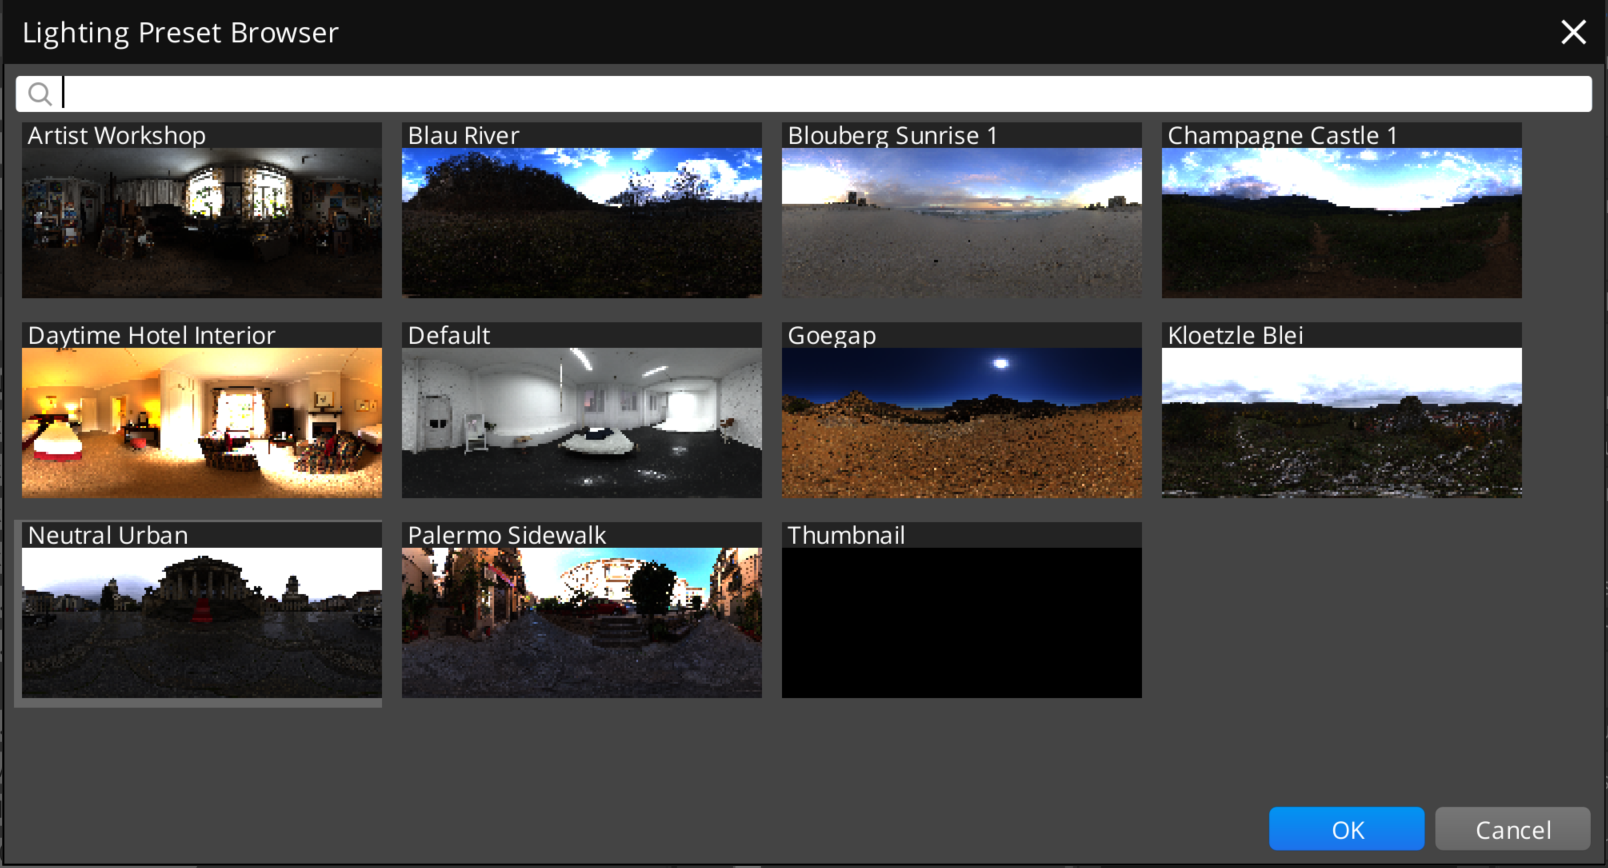
Note:The collection of lighting presets are stored in the folderGems/Atom/Tools/MaterialEditor/Assets/MaterialEditor/LightingPresets.
Inspector
In the Inspector, you can configure the properties for the active material. The Details group shows the material’s material type and optional parent material properties. All other property groups depend on the material type and are defined in the .materialtype file. See the
Material Type Reference
for all the material types in Atom and the property groups in each.
Asset Browser
The Asset Browser allows you to search for assets across O3DE, Gems, and other project folders. In the Material Editor, the Asset Browser is automatically filtered to show image and material assets. You can display more assets by changing the filter. When an asset is selected, a preview of the asset is shown on the side.
Python Terminal
With the Python Terminal, you can run Python commands to modify, import, and process various assets that the Material Editor uses, such as shaders, textures, and materials.
Performance Monitor
The Performance Monitor provides an overview of the Material Editor’s run-time performance. It displays the frame rate, and the GPU and CPU frame times. This is useful to gauge the CPU and GPU performance of materials and assets.